Showing posts with label tutorial. Show all posts

Monday, July 16, 2012

Make It // Donut Keychain

It's Monday and that means...Make It!  
 I'm going to share with you how to make a felt donut keychain.
 It's going to be cute and simple to create!
Let's get started! 
You will need:
felt
donut pattern
needle & thread
beads (for sprinkles!)
ribbon 
jump ring
scissors 
We looked around to see what I could use as my donut pattern and this is
what we found: a bobbin of solder and a penny. The bobbin measures 2"
First, cut out 2 pieces of donut (tan) felt and 1 piece of frosting (pink) felt.
Fold the pink felt in half and cut to create the frosting. 
Put your frosting felt on top of one of your donut felts and attach by
stitching them together. 
Now it's time to add the sprinkles! 
Oh so cute! Now it's time to get your other piece of donut felt to attach to
the bottom of your donut top. 
Attach the 2 pieces together by stitching through the smaller hole first. 
As you may notice I forgot that step originally and starting stitching the outside first. So...stitch the center circle before that! 
After you've stitched it together by the center circle then start stitching the outside together. Leave a little opening!
You'll want to stop and leave an opening! This will be for the ribbon. 
Get your ribbon and place it around your jump ring. 
Place your ribbon in the opening of the donut and stitch it up!
And there you have it friends! Your very own little felt donut keychain!
Wasn't that easy and fun?
Oooh, look at it in action! Just sittin' being a little felt donut keychain. 


Hope you enjoyed this tutorial! 
Happy making! 
♥ 

Monday, May 28, 2012

Make It // Repurposed Necklace

The other day I came across a bag full of earrings that I wore 9 years ago.
They were all beaded and dangly; a style I no longer wear. I knew I would
never wear them again but I didn't want to trash them so I decided to 
turn them into something I do wear often. Necklaces! 
For today's Make It I'm going to show you how to attach an old earring to a chain to make a repurposed necklace. 
Let's get started!
You will need:
chain
jump ring
an old earring
pliers
some earring pieces I dissembled   
1. Open your jump ring and put your earring piece through.
*When opening your jump ring twist it open with your pliers. Twist them 
where one will go toward you and the other one goes away from you. 
2. Put your chain in the jump ring too.
3. Time to close your jump ring! Use both of your pliers to grip the
 jump ring and twist it shut. 
That's it! Now you have a new necklace from an old piece of jewelry!
It's that easy.
Hope you enjoyed this mini DIY

Happy Making!

Monday, May 7, 2012

Make It // gold-dipped earrings

It's Monday! And for today's Make It I'm showing you how to make
gold-dipped polymer clay earrings. I'm loving the dipped look! This DIY 
is simple and a quick project. So let's get started!
You will need:
polymer clay
earring posts
razor
gold paint
paint brush
glue
painter's tape
*work on a clean surface when working with polymer clay. It tends to pick
up everything. Also, you can wear latex gloves to keep the clay from 
sticking to your hands and to keep your prints off the clay.
1. Cut a small piece from your polymer clay and knead the clay. I'm using 
Sculpey brand polymer clay. Knead the clay until it has become soft. 
2. Roll your clay into a ball and cut that ball in half with your razor.
3. Shape your two pieces of clay any way you like, just make sure
they have one flat surface.
4. Once your clay is shaped the way you like it's time to put it in the oven! 
Your polymer clay will say on the packaging how long you should bake the
clay. Mine is set to 275 °F  for 15 minutes.
5. After the clay is done baking, let cool. I let it cool for 15 minutes.
Now tape off your clay where you don't want it painted. Next, paint your clay.
Let dry and paint another coat. Repeat for the third time.
6. Once your paint has dried, slowing peel back the tape from the clay.
7. Add a dab of glue to your earring post and attach to the back 
of the clay. Let your earrings cure untouched for 24 hours so the glue
will have it's maximum bond. 
That's it! You now have a pair of gold-dipped earrings! Yay!
These little earrings would make a great gift for mom on Mother's Day!
Also, you can make your polymer clay piece bigger and make a ring or necklace. 
Hope you enjoyed this tutorial!

Happy Making! 

Monday, April 30, 2012

Make It // Mini Zipper Pouch

It's Monday! You know what that means...it's a MAKE IT post! 
Today I'm showing you how to make a mini zipper pouch. This is a great
beginners project; and it's simple and fun to make.
Also, Mother's Day is coming; make your mom one! 
Let's get started:
You will need:
Fabric (One for outer fabric, one for lining)
Interfacing (optional)
zipper 
scissors
thread
sewing machine

1. Cut 2 pieces of the outer fabric and 2 pieces of the lining fabric 
(mine measure 4 1/2 X 5 1/2)
Interfacing is optional but I love using it whenever I'm making pouches. 
I mainly use cotton fabric and the interfacing helps make it sturdy. 
 I used a fusible nonwoven interfacing. 
2. Get one of your lining fabrics and place it right side up, put your zipper
on top of your lining fabric and then place your outer fabric right side down onto the zipper and lining. Make sure all three edges line up and pin them together.
If you have a zipper foot use it; but if you don't, no worries we can
just use our regular ol' pressor foot. Sew along the top between the edge 
and the zipper teeth. 
Pull your fabric back and press it with an iron.
3. Repeat step 2! 
Pull your fabrics back and press with an iron.
4. Now that you have all fabrics attached un-zip the zipper halfway. 
This is important because once you stitch the pouch you will need 
to turn it right side out...through the opening. I forgot once, it was not fun.
5. Bring your outer fabrics to one side and your lining fabrics to
one side and pin them together. Lay your zipper on top of each other 
with the zipper teeth facing the lining fabrics.
Leave a 2 inch opening in your lining. If this is forgotten you have no way
in turning the fabric inside out. I've forgotten this step once before as well,
it was also not fun.
6. Sew around your pouch (except the opening) 1/4 inch from the edge.
Sew slowly when sewing over the zipper.
7. After sewing, snip your corners and excess zipper. 
8. Through your opening turn the fabric right side out.
Your pouch should look like this. Now press! 
9. Pin the opening and sew it closed.
10. Push your lining inside...
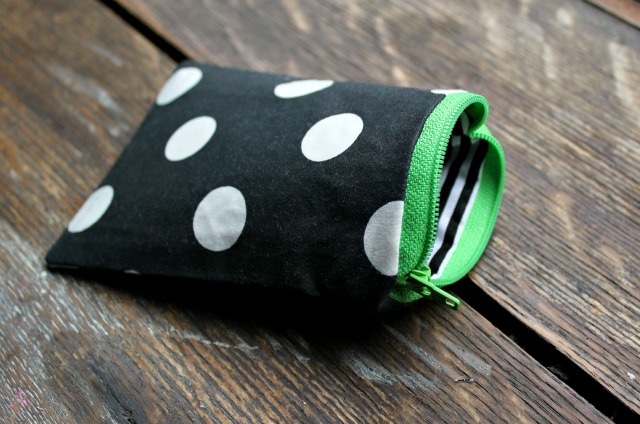
And you have a lined zipper pouch! Yay!! 
Wasn't that fun and simple?
If you made this size pouch it is perfect for holding your credit cards, cash,
license, lip balm and coins! You can make any size pouch with this method
just cut out a different size and get a zipper that fits. 

Hope you enjoyed this tutorial! 
Happy Making!